Mattress Stitch (Ladder Stitch)
Table of Contents
Mattress stitch is a useful stitching technique used for joining two pieces of fabric. This method has been used for a long time as it creates stitches that are nearly invisible, making it perfect for the purpose. The stitch is also known as Ladder Stitch. This article gives step-by-step instructions on how to work this stitch.
What is Mattress Stitch used for
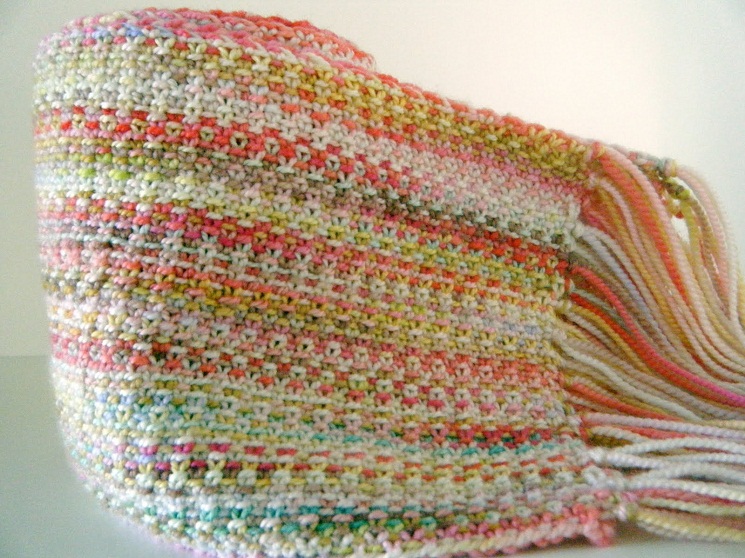
Mattress Stitch is popularly used for making sewn three dimensional items such as soft toys because it creates a nearly invisible seam. It is also quite useful for making all types of hand knit garments as it works very well with open or stretchy fabrics. The Ladder Stitch is often used for shoulder seaming. It is ideal for joining fabrics woven with knitting patterns like moss stitch, garter stitch and Stockinette stitch.
Mattress Stitch Supplies
This stitch is always worked by hand. You should use a sturdy and strong thread for sewing with the Mattress Stitch with quilting or upholstery thread being ideal for the purpose. Sturdy threads are suitable for this stitch because they are less likely to break when you pull the ladder stitching tightly to secure the joining. You will need a sharp needle for doing this stitch on fabric while metal yarn needle with a strand of strong yarn are necessary for working Ladder Stitch on knitting or crochet.
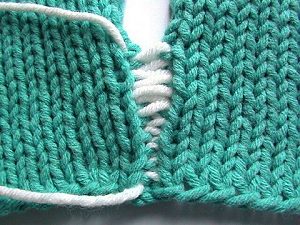
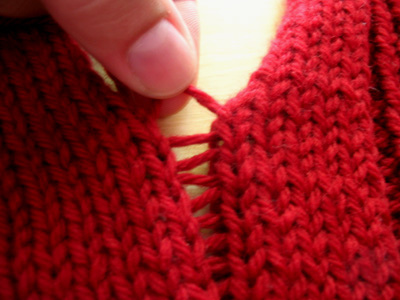
Mattress Stitch in Knitting
This stitch can be used to join woven fabrics from both the horizontal and vertical sides. It is always worked from the right-hand side.
- First, you have to place all the pieces you want to join together next to each other with the right side of each piece facing upwards.
- Now, commence to seam from the bottom edge.
- For the vertical Ladder Stitch, the needle has to be inserted between the 1st and 2nd stitches in from edge and underneath a “bar” of yarn running between the stitches to join cast-on rows. To work the horizontal Ladder Stitch, you have to start working with the last stitch located at the bottom of a column. Once you locate the stitch, you need to insert the needle under both of its “legs”.
- Do the same to work on the other piece. Pull the thread tightly after working on 2 cm to 3 cm seam.
This method can be used for joining fabrics knitted with almost any pattern. The parallel rows of the pieces being joined always come together in the seam, allowing the stripes, ribbed structures, jacquard and hole patterns can be properly combined.
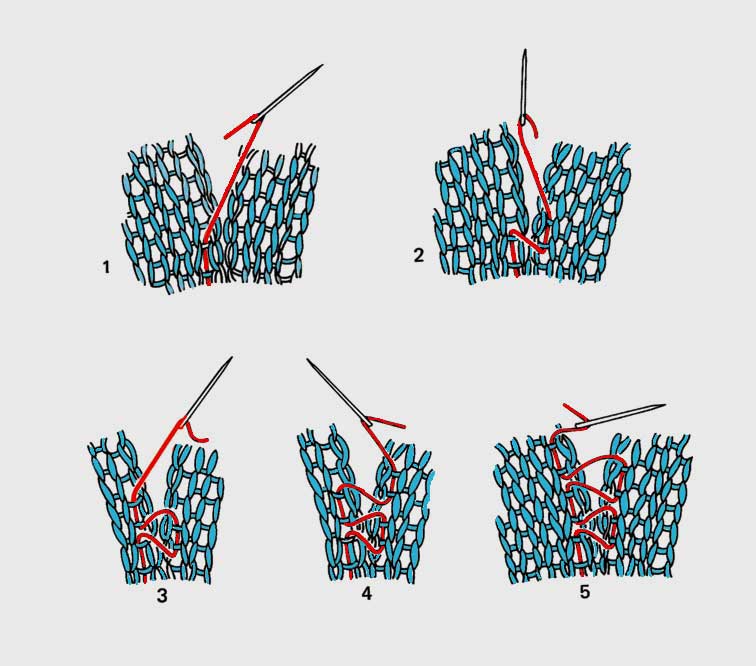
Mattress Stitch Crochet
It is quite tricky to join the seams in crochet, especially if you wish to keep the seam as inconspicuous as possible. There are several different methods for joining the different pieces of a crocheted article of clothing. Mattress Stitch is one of the few techniques that join crocheted fabrics together, keeping the seam barely visible.
- To join 2 pieces of crochet, lay the parts side by side on a plane surface with the right side up. Straighten the pieces, lining up the corresponding rows evenly.
- Then, thread your tapestry needle with a yarn matching your crochet.
- Start the seaming by running your needle through the very first stitches on the bottom edge of both the pieces of crochet. Then work one small stitch for securing the ends of the pieces or leave one long tail which can be woven later after you complete the seam.
- In the next step, the needle has to be inserted through the crochet’s first stitch on the seam’s right side. The yarn has to be pulled through loosely. Then, insert your needle through the corresponding stitch on the left side of the other crocheted piece. It is important to keep the needle’s tip pointing in the direction of the top of your work while stitching.
- Continue stitching like the last step while alternating sides with every stitch. Tighten the yarn gently after every 3 to 4 stitches while pulling the two sides together.
- In the next step, take 1 or 2 back stitches through the two sides of your work for securing the seam. Then break the yarn and secure it by running its end through several crochet stitches.
Instructions for Mattress Stitch Removal
The seamless appearance produced by this stitch makes it difficult to remove if you need to. There is always risk of cutting the wrong thread which can ruin your woven fabric. But, it is possible to remove the seaming stitches with a little patience, using a pair of sewing scissors, a seam ripper and a toothpick.
- Commence by folding your material along the seam to be ripped out. The seam becomes more exposed when you fold the material in this manner, which makes it easier to remove the stitches.
- Slip the toothpick under a stitch and pull up gently. You can use a dull tool which will not cut the stitch at once, but can help you to make sure that the stitch you are about to remove is really a Ladder Stitch and not a normal stitch in your material. This is more important when you are removing Ladder Stitch from a knitted material which could get completely ruined if you mistakenly cut the wrong stitch.
- Slip the seam ripper underneath the stitch to be cut while pulling the toothpick out. The seam ripper will easily remove the thread or yarn you used for the stitches.
- You can use the small sewing scissors for removing the stitches that the seam ripper was unable to remove. To do this, you have to tug the remaining stitches upward gently with the seam ripper and snip each stitch carefully with the scissors.
- Remove all scraps of yarn from the material once the Ladder Stitches have been removed. You have successfully removed the Ladder Stitches from your knitting project.
Mattress Stitch is a very useful seaming technique which is most commonly used for putting together the pieces of woven materials. Now that you know how to work as well as remove this stitch you can use it in your next knitting project.
Related Articles

Join Our Mailing List
Sign up to get the latest updates, along with fresh patterns and tutorials, right to your inbox