Blind Stitch
Table of Contents
Blind Stitch is one of the oldest hand stitching methods and has been used by sewers all over the world. The following article discusses the definition of this stitch, the procedure for making this stitch and much more.

Blind Stitch Definition
It is an easy sewing technique used for various sewing projects where you need to keep the seam or joint invisible. You can also work this stitch on your sewing machine; but, the method is quite difficult unless you are using the ‘zigzag stitch’ variation on the machine.
Blind Stitch Uses
Hand sewn or machine sewn Blind Stitch has high durability and is used as a hem stitch for various types of clothing articles such as skirts, pants, shirts and women’s dresses. It is ideal for garments where the hems must not draw much notice. The hand sewn form of this stitch is often used on custom made gowns. It is also ideal for upholstery repair in case of any minor cuts and tears in various upholstered items.
It is commonly used on draperies as well. The stitch gives a customized finish to roman shades and curtains. It is also often used for sewing pillows, cushions or stuffed toys and dolls closed because it remains unnoticeable while holding the fabric in place.
Another common use of the sewing technique is for quilt binding. Quilters often use the stitch for finishing various quilting projects as it adds a polished look to the right side of quilts. It is most commonly used in antique quilts.
The Blind Stitch is also used for attaching appliqué pieces to a background as it helps you to keep the stitches undetectable from the right side.
Instructions for Hemming with Blind Stitch
Tools necessary for working the stitch include a thread and a needle. The thread should be of the same color as the fabric you are about to hem to keep it as inconspicuous as possible. You can easily hem articles of garment following the directions given below:
- Step 1: First you need to fold the item properly to mark the area you want to hem. Iron the fold to keep it in place. This helps you to keep the hem straight.
- Step 2: Next, you need to fold the flattened hem back so that it creates an edge for you to sew the fabric’s edge to the garment.
- Step 3: In this step, you will be starting to sew the edge of the fabric to the garment. Begin by holding the needle in your right hand and start working from the far side of the fabric towards your right hand. If you are a left hander, you will be sewing with your left hand in this step. While working, the needle should point towards your left hand (right hand in case you are sewing with your left hand).
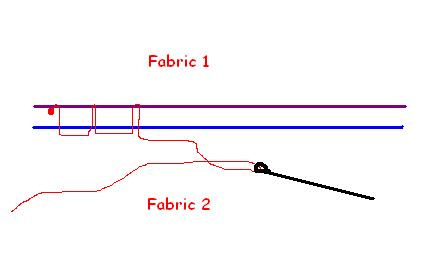
- Step 4: Run the needle through your fabric and pick up just a little portion of the fabric so that it will not be visible on the other side. At the same time, make one stitch into your fabric’s edge to hem it. See the following diagram to understand the position of the needle.

- Step 5: Continue sewing in this manner, repeating the whole procedure described in the previous step. Make sure to sew in the direction of your dominant hand. Each new stitch will begin at the point where the previous stitch ends.
The Blind Catch Stitch is another similar hemming method which is often used for knitting projects due to its great flexibility.
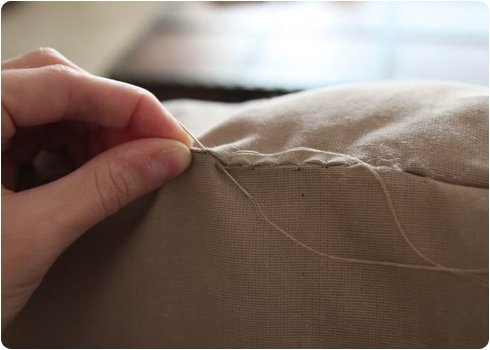
Instructions for Seaming with Blind Stitch by Hand
The procedure for blind stitching a seam is similar to the process of hemming with the stitch. Seaming with this stitch by hand is a time consuming procedure, but the end result is worth your time as you can hardly see the thread on the right side of your project. Here are the step-by-step instructions:
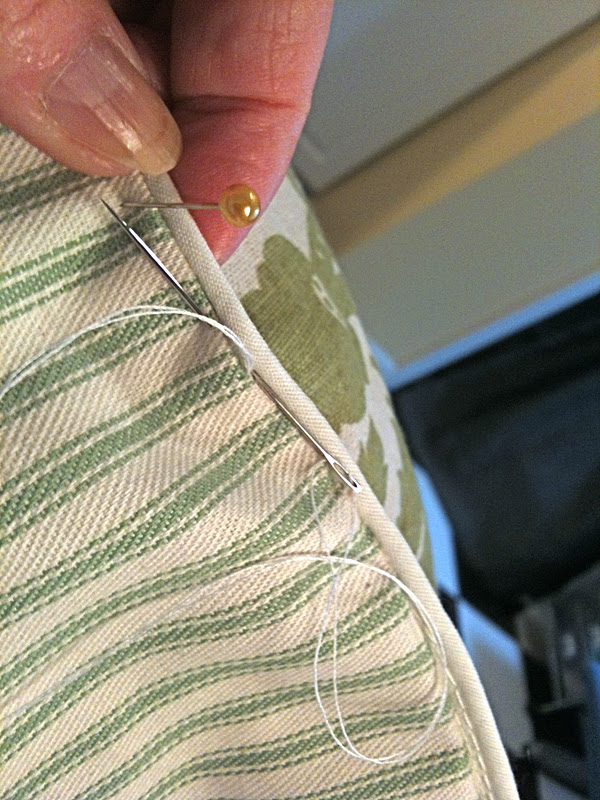
- Step 1: When finishing a pillow or lining by closing its final seam with this stitch, you need to fold under the project’s seam allowances and iron it properly for keeping it in place. You will have 2 parallel folded edges of the fabric that you will be seaming.
- Step 2: Use a simple running stitch for sewing ¼ inch long stitches, ¼ inch apart from each other while altering between the 2 folded sides of your fabric.
- Step 3: Continue stitching in this manner, just below the ironed fold on the two sides, pulling both sides together as your work progresses. Make sure not to pull too tightly as it may make the fabric pucker which will ruin your project.
How to Make a Machine Blind Stitch?
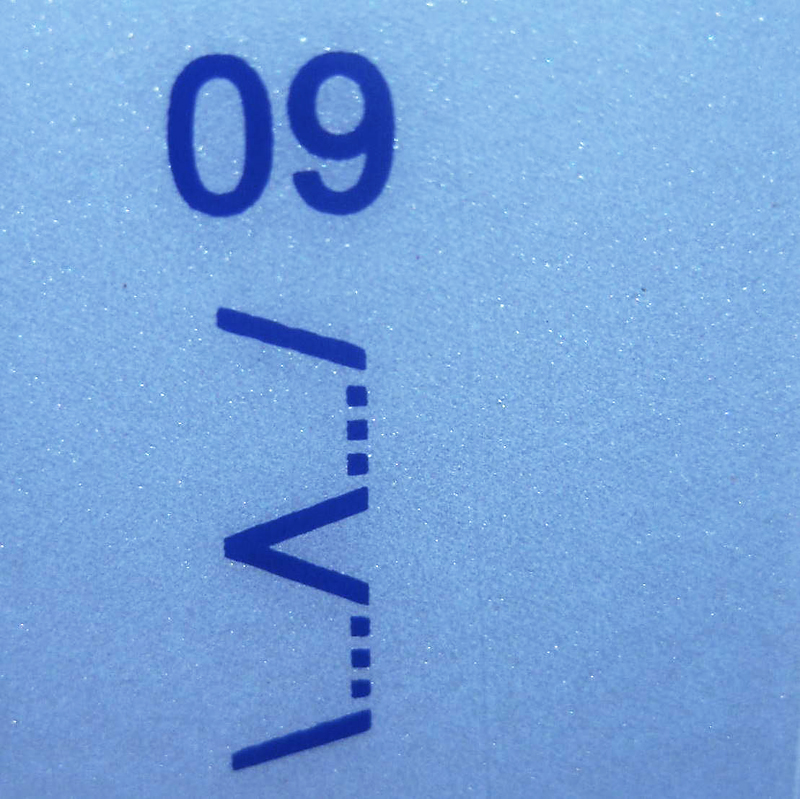
This stitch can be sewn in almost all types of sewing machines, no matter how old or cheap they may be. You will need to use the blind-hem function on your machine. Look for the stitch function symbol that looks like the following diagram:
Once you find it, you are ready to start working on your project and sew this stitch with your sewing machine. Here are the basic instructions about how to do it:
- Step 1: First, you need to prepare the hem for stitching as proper preparation is the key to this stitching method. Fold the edge of your fabric in the similar manner mentioned in the instructions for hemming with Blind Stitch. However, in this procedure you need to fold the hem by about 0.5 inch (or 0.25 inch), iron the fold and then fold another 1 inch (or 0.5 inch), then iron the fold again.
- Step 2: Pin the folded edges of the fabric to keep it in place. The placement of the pins is very important for working the stitch properly. You need to place the pins at least 0.25 inch apart in a perpendicular manner along the hemline down from your upper fold. This allows you to expose the top edge of the hem by flipping it up so that you can stitch it easily.
- Step 3: Once you are done pinning the double-folded hem, you need to flip it toward its right side in a manner that only about 0.25 inch of each pin is visible from underneath the flipped fold. Most of the stitching work will be done on this flap. It is a part of your hem, not your garment and the stitching will not be visible from the garment’s right side. Start stitching, keeping the stitching line straight and at the center on the ironed flap.
You can use the flywheel to make sure that the stitching is done slowly until you make the first zigzag. Before your needle comes down, you need to make sure that the needle will nip into no more than 1 or 2 threads of the fabric.
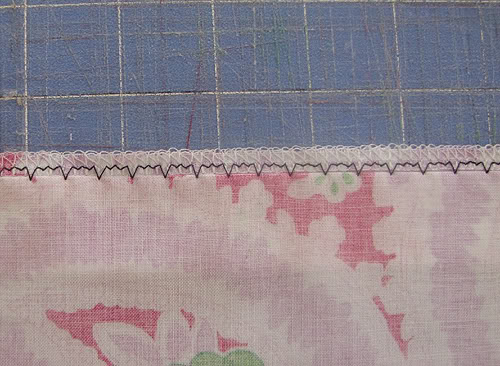
In case you cannot make the stitches properly with your machine, you can lift your machine’s presser foot to move the fold just a bit so that your needle will catch a small portion of the fabric. The zigzag stitches on the folds can be seen from the fabric’s right side. Due to this reason, your thread should be of the same color as the fabric you are sewing to keep the stitches undetectable. The following picture shows how the stitch will look from the right side of your fabric.
Once you work out the proper placement of the fold, you need to continue sewing in the same manner until you complete sewing the length of the hem.
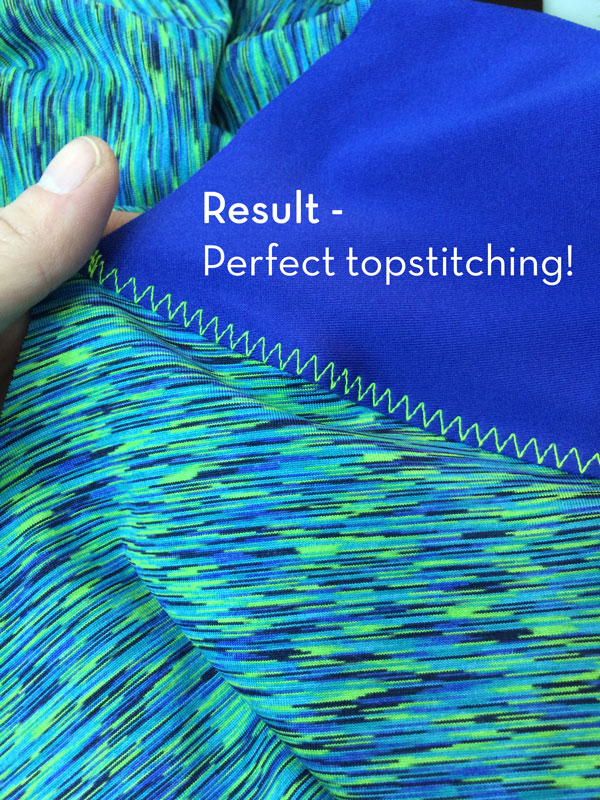
- Step 4: Once you complete sewing the hem, you need to flatten it by ironing. Do not forget to flip your hem back to its initial position before pressing it. When the hemming is done, only tiny dot stitches should be visible from the right side where the zigzags stitches are sewn into the fold. If you continue reaching further into this fold, you will find longer stitches.
It is advisable to practice the stitch on a few scrap fabrics before you can use it in a stitching project. Once you master the procedure, you will be able to save a lot of time on the finishing of your sewing projects.
Now you know the secret of the invisible seams and hems you often see on the pillows, cushions, garments and many other fabric items you buy. Start practicing the stitch and you will become an expert in blind stitching within a short time. Use the technique in your next stitching project to draw the attention and admiration of those around you.
Related Articles

Join Our Mailing List
Sign up to get the latest updates, along with fresh patterns and tutorials, right to your inbox